How to Build Your Own Home Network: A Step-by-Step Guide
Zak
20th October 2026
If you're tired of patching WiFi problems with gadgets, the real answer is to build your home network the way a business would: cables to the right places, proper access points, and one system managing it all.
This guide explains how to plan and build a reliable home network, step by step. Whether you do it yourself or book a professional home WiFi installation, you'll know what good looks like.
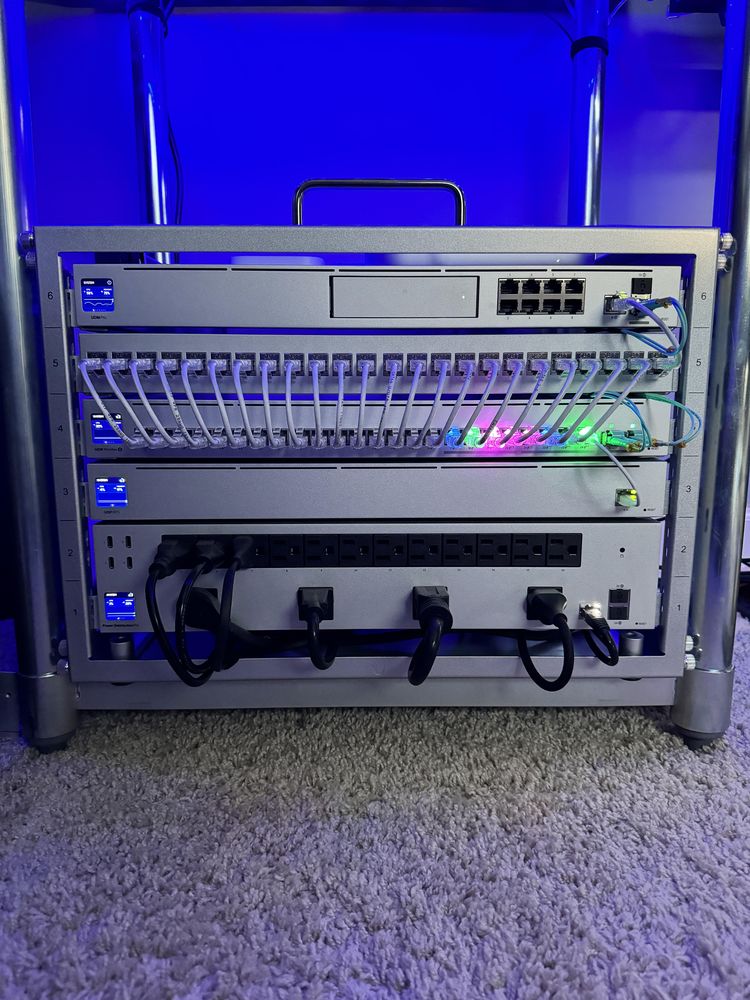 Professional UniFi network rack installed in a customer's home
Key Takeaways
- A good home network has four parts: the internet connection, a router, a switch, and access points.
- Cables do the heavy lifting. WiFi should only cover the last few metres to your device.
- PoE (Power over Ethernet) lets one cable carry both data and power to each access point.
- Plan the cable routes first. They're the hardest part to change later.
The Four Parts of a Home Network
1. The internet connection
This is where your broadband enters the house: a fibre box (called an ONT) on full fibre, or a phone or cable socket. You can't usually move it, but you can run a cable from it to wherever your network gear lives.
2. The router
The router connects your home to the internet and hands out addresses to your devices. Your ISP's router can do this job perfectly well. You don't have to replace it. Many ISP hubs can also be switched into a "modem mode" so your own router takes over.
3. The switch
A switch gives you more network ports, so one cable from the router can feed many cables round the house. Choose a PoE switch and it can power your access points down the same cable, so there's no plug needed on the ceiling.
4. Access points
Access points provide the WiFi. Mounted on ceilings and cabled back to the switch, they give strong, even coverage in every room, and they all broadcast one network name.
Step 1: Pick a Home for Your Network Equipment
Choose one spot where your router and switch will live. Good places include an understairs cupboard, a utility room, a loft, or a garage. It should have:
- A power socket.
- Some airflow, because switches and routers produce heat.
- A route to get cables to the rest of the house.
A small wall-mounted rack keeps everything tidy, labelled and easy to work on.
Step 2: Plan Your Access Points
Aim for one access point per floor in a typical house, plus:
- An extra one for large open-plan spaces.
- One in the home office if you work from home.
- One for the garden office or outbuilding.
Ceilings in central hallways and landings are often ideal, because they're easy to cable to and spread signal into the rooms around them.

Not sure whether you need access points or mesh? See WiFi Extender vs Mesh vs Wired Access Points. And skip extenders entirely: here's why they don't work.
Step 3: Plan Your Cable Routes

Cabling is the hardest part to change later, so plan it carefully.
- Use Cat6 cable. It's affordable, handles today's speeds comfortably, and lasts.
- Keep each run under 100 metres, the limit for standard Ethernet.
- Route through lofts, under floors and inside stud walls where you can.
- Run cables to where your TV, games console and desk computer will sit, too. Wired devices free up WiFi for everything else.
- Use outdoor-rated cable, ideally in ducting, for runs to garden offices.
If you're building or renovating, run network cable while the walls are open. It's far cheaper than adding it later.
Step 4: Choose Your Equipment
Look for:
- Access points that support WiFi 6 or newer. WiFi 6E and WiFi 7 add the 6GHz band, which is less crowded but shorter range.
- A PoE switch with enough power for all your access points, plus spare ports.
- A single management app or controller, so all the access points act as one system.
- Support for roaming standards (often listed as 802.11k, v and r), which help your devices move between access points smoothly.
Stick to one brand for your access points so they work together properly.
Step 5: Connect Everything
- Connect the router to the internet connection.
- Connect the PoE switch to the router.
- Connect each access point cable to the switch.
- Mount the access points on the ceiling, central to the area they cover.
- Connect wired devices, such as the TV and desktop, to the switch or to wall sockets.
Step 6: Configure It Properly
- Use one WiFi name and password across all access points.
- Turn off the WiFi on your ISP router if your access points are taking over, so they don't clash.
- Use WPA3 security (or WPA2/WPA3 mixed mode if older devices need it).
- Create a guest network for visitors, and consider a separate one for smart devices.
- Keep transmit power sensible. Turning every access point up to maximum often makes roaming worse, not better.
- Update the firmware on your router and access points.
We cover settings in more depth in Home Network Best Practice: 12 Rules for Fast, Secure WiFi.
Step 7: Test Every Room
Walk round with your phone and test the speed in every room, as described in How to Get WiFi in Every Room. Make a call while moving from room to room to check roaming works. If one area is weak, adjust the access point position or power before adding more hardware.
DIY or Professional Install?
If you're comfortable lifting floorboards, working in the loft and terminating network cable, you can build an excellent network yourself.
A professional install makes sense when:
- You don't want to lift floors or drill through walls.
- The house has thick stone walls, multiple floors or outbuildings.
- You want it surveyed, planned, installed and tested in one go, with someone to call if anything goes wrong.
Frequently Asked Questions
Do I need to replace my ISP router?
No. Your ISP router can keep handling the internet connection while your own access points provide the WiFi. Just turn off the router's WiFi.
What cable should I use for a home network?
Cat6 is the sensible choice for most homes. Use outdoor-rated cable for anything running outside.
What is PoE?
Power over Ethernet sends power down the same network cable as the data. It means access points don't need a nearby socket.
Where Conxiea Fits
We survey, cable, install and test your home network, with tidy cabling and ceiling-mounted access points. It's one fixed price with a no-fix, no-fee guarantee, for homes across the South West.

