How to Configure FortiGate SD-WAN Over MPLS: eBGP Neighbor Groups, Inter-VDOM iBGP and OSPF Route Tagging
Zak
26 October 2026

Most FortiGate SD-WAN guides stop at "build two tunnels and add an SD-WAN rule". That's fine for three sites. It falls apart at thirty, when every new branch means editing the hub, every VDOM has its own routing table, and one careless redistribution sends routes round in a circle.
This is the design we use for multi-site networks running SD-WAN over MPLS with a FortiGate hub and FortiManager. It's built around one goal: a new spoke should come online and pick up exactly the same policy as every other spoke, without anyone touching the hub.
We'll cover:
- Remote sites on IPsec tunnels over MPLS (and internet) into an SDWAN VDOM
- eBGP to the spokes using neighbor groups and neighbor ranges
- Inter-VDOM links (IVLs) with iBGP between VDOMs, filtered with prefix lists and route-maps
- Redistributing between OSPF and BGP with route tags, so routes can't loop back
- Templating all of it in FortiManager
The examples use FortiOS 7.4/7.6 CLI. Addresses and AS numbers are illustrative, swap in your own.
The Design at a Glance
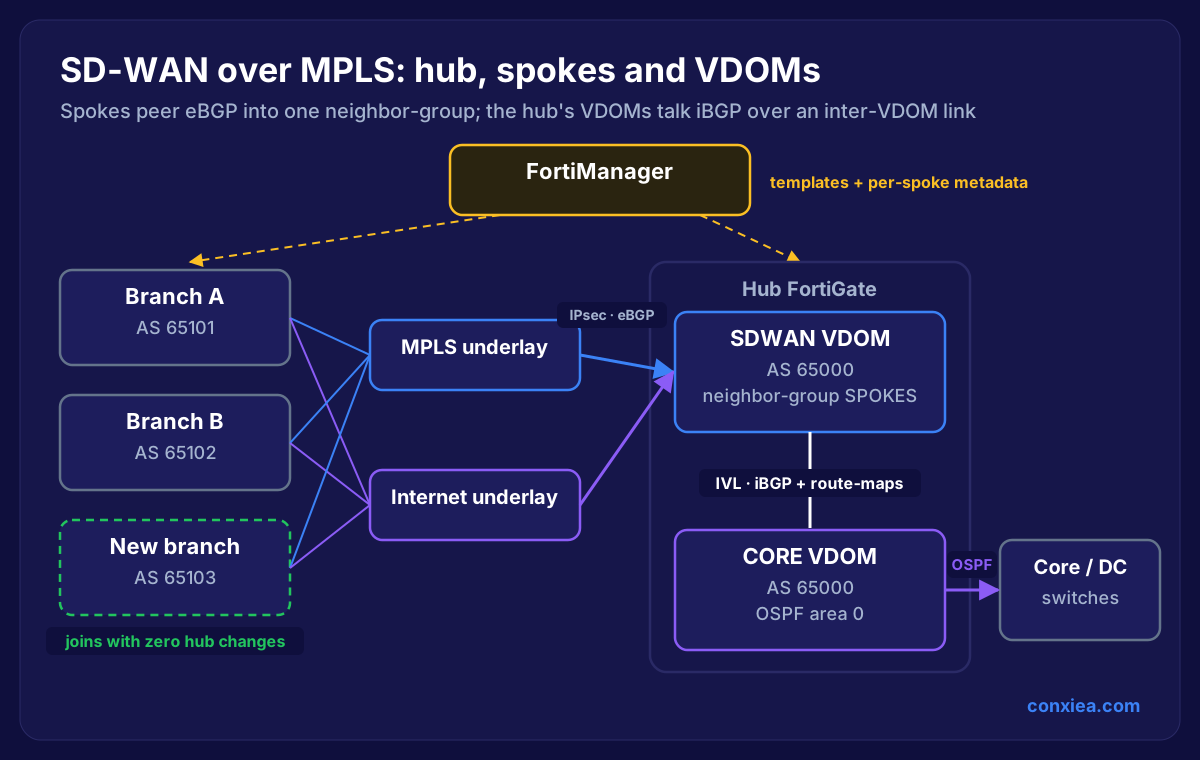 Diagram of the SD-WAN design: branches connect over MPLS and internet underlays via IPsec and eBGP to the SDWAN VDOM on the hub FortiGate, which connects over an inter-VDOM link with iBGP to the CORE VDOM running OSPF to the core switches, with FortiManager pushing templates to all devices
- Spokes each have their own private AS (65101, 65102, ...) and build IPsec tunnels to the hub over both underlays: MPLS as the preferred path, internet as backup.
- The SDWAN VDOM on the hub terminates the tunnels and runs eBGP to every spoke through a single neighbor group.
- The CORE VDOM runs OSPF with the core and data centre switches.
- The two VDOMs are joined by an inter-VDOM link and exchange routes over iBGP, with route-maps controlling exactly what crosses.
- FortiManager holds templates for all of it, so spokes are built from a blueprint rather than by hand.
Splitting the hub into VDOMs keeps the overlay (lots of tunnels, lots of BGP peers, frequent change) separate from the core (OSPF, stable, business critical). A mistake on the SDWAN side can't flood OSPF, because nothing crosses the IVL unless a route-map allows it.
If you're still weighing up whether SD-WAN is right for you at all, start with SD-WAN vs traditional WAN and our guide to SD-WAN for multi-site businesses.
Step 1: Dial-Up IPsec Tunnels on the Hub
Each underlay gets one dial-up (dynamic) phase 1 on the hub. Spokes dial in; the hub never needs a per-spoke tunnel.
config vdom
edit SDWAN

config vpn ipsec phase1-interface
    edit "HUB-MPLS"
        set type dynamic
        set interface "port3"            # MPLS-facing interface
        set ike-version 2
        set peertype any
        set net-device disable
        set mode-cfg enable
        set add-route disable
        set dpd on-idle
        set ipv4-start-ip 10.200.1.1
        set ipv4-end-ip 10.200.1.253
        set ipv4-netmask 255.255.255.0
        # proposals and PSK/certificate settings omitted
    next
end

config system interface
    edit "HUB-MPLS"
        set ip 10.200.1.254 255.255.255.255
        set remote-ip 10.200.1.253 255.255.255.0
        set allowaccess ping
    next
end
Repeat for HUB-INET on the internet interface with its own range (for example 10.200.2.0/24). Two things matter here:
net-device disablekeeps all spokes on one tunnel interface instead of creating one interface per spoke, which is what lets a single BGP neighbor range cover them.add-route disablestops IKE injecting static routes. BGP is the only thing deciding where traffic goes.
Step 2: eBGP Neighbor Groups So New Spokes Inherit Policy
This is the part that makes the design scale. Instead of one neighbor entry per spoke, the hub has a neighbor group (the policy) and a neighbor range (the subnet spokes can peer from). Any spoke that comes up with a tunnel IP inside the range is accepted automatically and gets the group's route-maps, timers and settings.
Because each spoke uses its own AS, the group uses remote-as-filter with an AS path list rather than a single remote-as:
config router aspath-list
    edit "AS-SPOKES"
        config rule
            edit 1
                set action permit
                set regexp "^651[0-9][0-9]quot;
            next
        end
    next
end

config router bgp
    set as 65000
    set router-id 10.255.0.1
    set ebgp-multipath enable
    config neighbor-group
        edit "SPOKES-MPLS"
            set remote-as-filter "AS-SPOKES"
            set interface "HUB-MPLS"
            set route-map-in "RM-SPOKES-IN"
            set route-map-out "RM-SPOKES-OUT"
            set soft-reconfiguration enable
            set link-down-failover enable
        next
    end
    config neighbor-range
        edit 1
            set prefix 10.200.1.0 255.255.255.0
            set neighbor-group "SPOKES-MPLS"
        next
    end
end
Add a matching SPOKES-INET group and range for the internet overlay.
A few things worth knowing:
remote-asandremote-as-filterare mutually exclusive in a neighbor group. Unset one before setting the other (Fortinet docs).remote-as-filterarrived in FortiOS 7.4.4 and 7.6.0. On older firmware you either give all spokes the same AS (and allow it in withallowas-inon the spokes) or run iBGP to the spokes instead.- A neighbor range makes the hub passive: it waits for spokes to open the session. That's what you want, the spoke is the side that knows when its tunnel is up.
- The regex is your guard rail. A device that builds a tunnel but presents an AS outside 65100–65199 won't peer.
The payoff: the hub config never changes when you add branch 31. The new spoke dials in, lands in the range, matches the AS filter and inherits RM-SPOKES-IN and RM-SPOKES-OUT like every other branch.
On the spoke
The spoke side is a plain eBGP neighbor per hub tunnel, plus SD-WAN rules preferring MPLS:
config router bgp
    set as 65101
    set router-id 10.255.1.101
    config neighbor
        edit "10.200.1.254"
            set remote-as 65000
            set interface "HUB-MPLS"
            set soft-reconfiguration enable
        next
        edit "10.200.2.254"
            set remote-as 65000
            set interface "HUB-INET"
            set soft-reconfiguration enable
        next
    end
    config network
        edit 1
            set prefix 10.101.0.0 255.255.255.0    # branch LAN
        next
    end
end

config system sdwan
    set status enable
    config zone
        edit "OVERLAY"
        next
    end
    config members
        edit 1
            set interface "HUB-MPLS"
            set zone "OVERLAY"
        next
        edit 2
            set interface "HUB-INET"
            set zone "OVERLAY"
        next
    end
    config health-check
        edit "HUB"
            set server "10.255.0.1"
            set members 1 2
            config sla
                edit 1
                    set latency-threshold 150
                    set jitter-threshold 30
                    set packetloss-threshold 2
                next
            end
        next
    end
    config service
        edit 1
            set name "CORP-PREFER-MPLS"
            set mode sla
            set dst "CORP-NETS"
            config sla
                edit "HUB"
                    set id 1
                next
            end
            set priority-members 1 2
        next
    end
end
Traffic to corporate networks uses MPLS while it meets the SLA, and fails over to the internet overlay when it doesn't. Every value that differs per spoke (AS, router ID, LAN prefix) is exactly what FortiManager metadata variables are for, more on that in Step 5.
Step 3: Inter-VDOM Links With iBGP and Route-Maps

An inter-VDOM link is a pair of virtual interfaces, one end in each VDOM. Standard VDOM links don't need IP addresses for simple static routing, but dynamic routing needs them, so give the link a /30:
config global
config system vdom-link
    edit "vl-core"
    next
end
config system interface
    edit "vl-core0"
        set vdom "SDWAN"
        set ip 10.254.0.1 255.255.255.252
        set allowaccess ping
    next
    edit "vl-core1"
        set vdom "CORE"
        set ip 10.254.0.2 255.255.255.252
        set allowaccess ping
    next
end
end
On hardware with NP6 or NP7 processors, consider the NPU VDOM links (npu0_vlink0 / npu0_vlink1) instead. Standard VDOM links can't be hardware offloaded, and at the hub every branch-to-DC flow crosses this link.
Both VDOMs share AS 65000, so the session across the IVL is iBGP. In the SDWAN VDOM:
config router bgp
    config neighbor
        edit "10.254.0.2"
            set remote-as 65000
            set interface "vl-core0"
            set next-hop-self enable
            set route-map-in "RM-FROM-CORE"
            set route-map-out "RM-TO-CORE"
            set soft-reconfiguration enable
        next
    end
end
next-hop-self matters: routes learned from spokes carry the spoke's tunnel IP as next hop, which the CORE VDOM can't reach. Rewriting the next hop to the IVL address fixes that. The CORE VDOM gets the mirror-image neighbor pointing at 10.254.0.1.
Prefix lists and route-maps decide what crosses
Prefix lists define the route sets; route-maps apply them. Anything that doesn't match a permit rule is dropped:
config router prefix-list
    edit "PL-SPOKE-LANS"
        config rule
            edit 1
                set prefix 10.100.0.0 255.252.0.0
                set ge 24
                set le 24
            next
        end
    next
    edit "PL-CORE-TO-SPOKES"
        config rule
            edit 1
                set prefix 10.0.0.0 255.255.0.0    # data centre / servers
                set le 24
            next
            edit 2
                set prefix 172.16.0.0 255.255.0.0  # shared services
                set le 24
            next
        end
    next
end

config router route-map
    edit "RM-TO-CORE"
        config rule
            edit 1
                set match-ip-address "PL-SPOKE-LANS"
            next
        end
    next
    edit "RM-FROM-CORE"
        config rule
            edit 1
                set match-ip-address "PL-CORE-TO-SPOKES"
            next
        end
    next
end
PL-SPOKE-LANS only accepts /24s from the branch range. If a spoke accidentally advertises a default route or someone's home lab subnet, it stops at the SDWAN VDOM and never reaches the core. The same idea applies to RM-SPOKES-IN on the neighbor group: accept branch LANs only.
Step 4: OSPF to BGP Redistribution With Route Tags
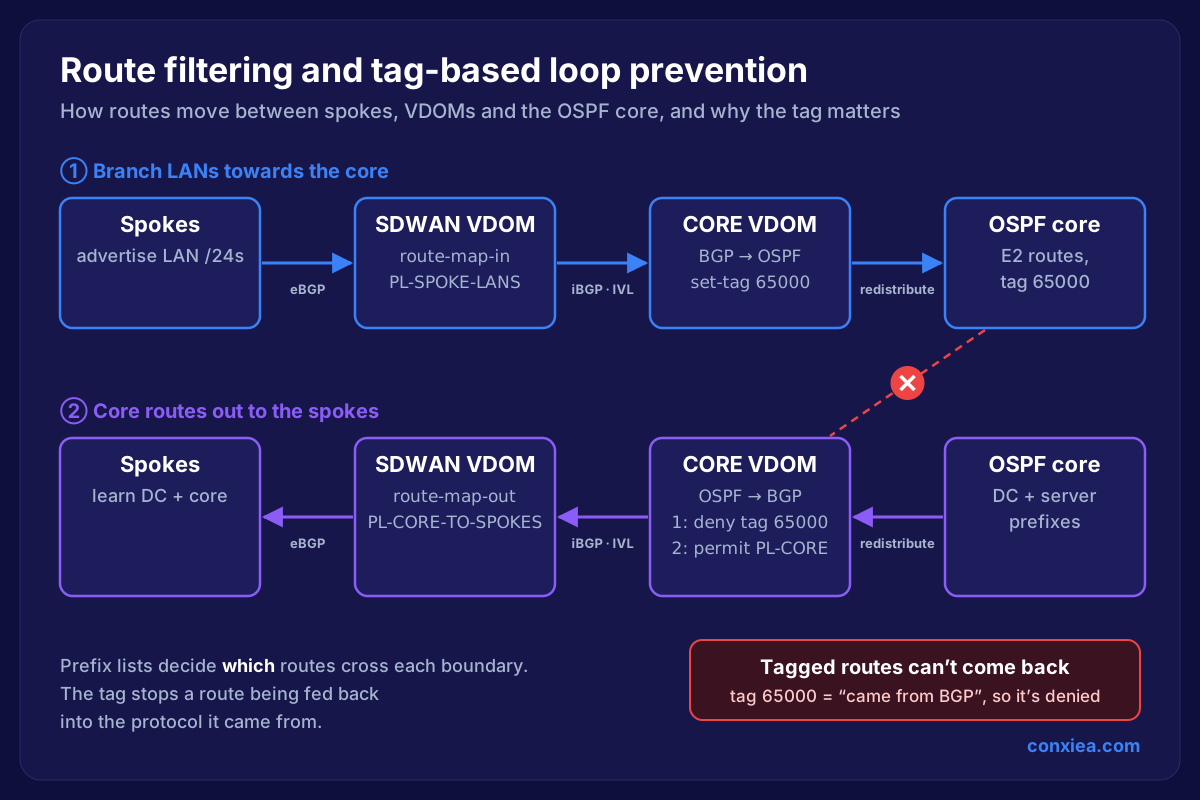 Diagram showing branch routes flowing from spokes through the SDWAN VDOM and CORE VDOM into OSPF with tag 65000, and core routes flowing back out to the spokes, with tagged routes denied when redistributing from OSPF to BGP
The CORE VDOM is where the overlay meets the core, so this is where redistribution happens:
- BGP → OSPF: branch LANs learned over iBGP are pushed into OSPF so the core switches know how to reach them. Each one is tagged on the way in.
- OSPF → BGP: data centre and server prefixes from OSPF are pushed into BGP so they reach the spokes. Anything carrying the tag is denied, because it originally came from BGP.
config vdom
edit CORE

config router route-map
    edit "RM-BGP-TO-OSPF"
        config rule
            edit 1
                set match-ip-address "PL-SPOKE-LANS"
                set set-tag 65000
            next
        end
    next
    edit "RM-OSPF-TO-BGP"
        config rule
            edit 1
                set action deny
                set match-tag 65000
            next
            edit 2
                set match-ip-address "PL-CORE-TO-SPOKES"
            next
        end
    next
end

config router ospf
    config redistribute "bgp"
        set status enable
        set routemap "RM-BGP-TO-OSPF"
    end
end

config router bgp
    config redistribute "ospf"
        set status enable
        set route-map "RM-OSPF-TO-BGP"
    end
end
Rule order is the whole trick. Rule 1 drops anything tagged 65000 before rule 2 gets a chance to permit it.
Why the tag matters
With one redistribution point, a router won't usually re-learn its own external routes. But real networks rarely have one. Add a second hub, a DR data centre, or a second core VDOM doing the same redistribution, and a branch route can go BGP → OSPF at site A, travel across the core, then OSPF → BGP at site B and get advertised back to the spokes as if it came from the data centre. Best case, you get suboptimal paths. Worst case, a loop that only shows up when a link fails.
The tag marks a route as "came from BGP". It survives across the OSPF domain on the external LSA, so every redistribution point can recognise it and refuse to send it back. Core routes reach the spokes; branch routes reach the core; nothing goes round twice.
Two practical notes from Fortinet's own guidance:
- Keep tag values at or below 2147483647. Higher values can be altered during redistribution on some FortiOS builds. A value like your AS number is easy to remember and well within range.
- If you need different handling for different BGP communities, tag them on the BGP inbound route-map first, then match the tag when redistributing to OSPF. Communities themselves can't be matched in the OSPF redistribution.
Step 5: Templating It All in FortiManager

Everything above can be typed into the CLI, but by the tenth spoke you'll have ten slightly different configs. FortiManager makes the design repeatable:
- SD-WAN overlay template / overlay orchestration: the wizard creates IPsec templates, BGP templates, an SD-WAN template, CLI templates, template groups and metadata variables in one pass (FortiManager docs). It's a good starting point, though it doesn't build SD-WAN rules for you, and its defaults won't match an eBGP-per-spoke design exactly. We adjust the BGP templates to match the design above.
- Metadata variables hold everything that differs per site:
branch_id, spoke AS, router ID, LAN prefix. Templates reference the variables, so the template is identical for every spoke. - Device groups and template groups: add a new FortiGate to the branch device group and the whole template group applies to it automatically.
- CLI templates cover anything the GUI templates don't, such as the AS path list, prefix lists and route-maps.
Combined with the neighbor group on the hub, onboarding a new site becomes: register the device, set its metadata, install. The hub doesn't change, the route-maps don't change, and the new branch gets the same SD-WAN rules and filtering as every other site. That's also what makes network change management and configuration management workable at scale, because there's one source of truth instead of fifty hand-edited boxes.
Verifying It Works
Run these in the relevant VDOM (config vdom / edit SDWAN or edit CORE):
get router info bgp summary
get router info bgp neighbors 10.254.0.2 advertised-routes
get router info bgp neighbors 10.254.0.2 received-routes
get router info ospf database brief
get router info routing-table all
diagnose sys sdwan health-check
What to check:
- On the SDWAN VDOM: every spoke appears in
bgp summary, learned dynamically, with its own AS. - Across the IVL:
advertised-routestowards CORE contains only branch /24s.received-routesfrom CORE contains only the data centre and shared-services prefixes. - In OSPF: branch prefixes appear as external routes with tag 65000.
- Back in BGP: none of the tagged prefixes reappear as redistributed OSPF routes.
Common Mistakes We See
- Forgetting
next-hop-selfon the IVL. Routes arrive in the CORE VDOM but never install, because the next hop is a spoke tunnel IP the CORE VDOM can't reach. - Redistributing without a route-map.
config redistribute "ospf"with no route-map sends everything, including the routes you just redistributed from BGP. - Per-spoke neighbors on the hub. It works until someone forgets one. Use a neighbor group and range from day one.
- No prefix list on spoke inbound. One misconfigured branch advertising 0.0.0.0/0 can attract traffic from every other site.
- Wrong rule order in the OSPF → BGP route-map. The deny-by-tag rule must come first.
- Standard VDOM links on a busy hub. Use NPU links where the platform supports them, or the IVL becomes the bottleneck.
If you're also moving off legacy firewalls as part of the project, our firewall migration automation guide covers how to do it without a weekend of downtime.
Need a Hand With FortiGate SD-WAN?

We design and deploy this architecture for multi-site businesses: FortiGate hubs and spokes, SD-WAN over MPLS and internet, VDOM separation, BGP and OSPF integration, and FortiManager templates so every new site inherits the same policy.
That covers greenfield builds, migrations from MPLS-only or legacy VPN meshes, and untangling existing designs where routes have started looping or new sites take days to bring online. Once it's built, our AI InfraOps platform can monitor it, catching tunnel flaps, BGP session drops and SLA breaches before users notice.
- See our network services
- How to choose an SD-WAN provider
- SD-WAN for retail and multi-branch businesses
→ Talk to us about your FortiGate SD-WAN project
No obligation. Tell us how many sites you have and what's running today, and we'll tell you honestly whether this design fits.
Related Reading
Keep Reading


Additional Resources
- Fortinet: Assigning multiple remote ASes to a single BGP neighbor group (FortiOS 7.6)
- Fortinet: Dynamic BGP on loopback, dual-hub region (SD-WAN architecture for MSSPs)
- Fortinet: Configuring an SD-WAN overlay template (FortiManager 7.6)
- Fortinet: Objects and templates created by the SD-WAN overlay template (FortiManager)
- Fortinet: Inter-VDOM routing configuration example, partial-mesh VDOMs
- Fortinet: Configuring inter-VDOM routing in FortiManager
- Fortinet Community: Configure OSPF route tag for redistributed prefixes